|
Topic: |
Rig Shots 6: The mechanics of rig shots |
|
Author/Copyright: |
John Jovic |
Rig shots are created by physically
connecting a camera to a moving subject (a car) and making exposures
long enough to achieve enough background blur or movement to make the
subject appear to be moving much faster than it really is. This often
requires an exposure several seconds long so you may need to shoot them
in a relatively dark environment, hence the preponderance of rig shots
shot at night or in under cover car parks. Rig shots can easily be shot
in bright sunlight however the bright sunlight will need to be tempered
with Neutral Density filters which are designed to reduce the amount of
light passing through the lens without having any other effect on the
image. Sunlight also causes shadows which will either have to be
avoided, in the case of partial rig shots, or removed in post for
full
car rig shots.
Rig shots should always be shot at
the slowest practical and safe speed, usually no faster than walking
pace. If possible, walk with the camera and rig operating the cameras
shutter manually, possibly with a cable release. In many cases it can help to apply a
little pressure on the camera, or kind of 'pre load' it, as this seems
to help to reduce the vibration passing to the camera. Use the
cameras histogram to set the exposure, trying not to burn out the sky
but paying the most attention to not loosing shadow details. Always
shoot RAW, always!
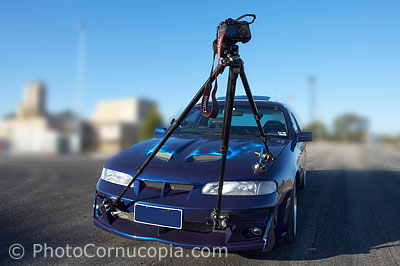
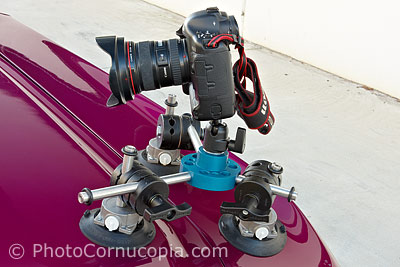
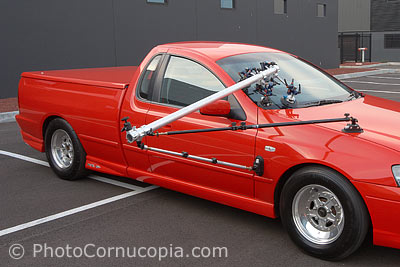
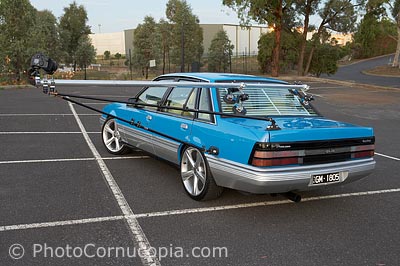
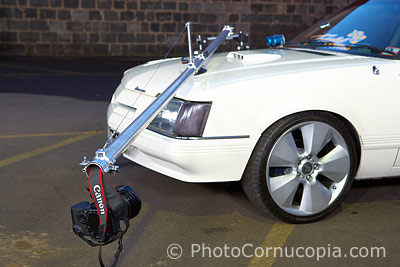
It might sound easy but in reality it
can be quite hard to connect a camera to a car with enough rigidity so
that you get a very sharp image during an exposure of several seconds. A
very short and simple rig, such as a tripod with suction cups, can be
very rigid and can pretty much be relied upon for very sharp images.
Once you extend the camera many meters from the car, using some kind of
boom, you are much more likely to have flex in the boom which will
render images soft.
There are many factors that come into play and that
will have an effect on how sharp your image will be. This is by no means
an exhaustive list but these are just some of the factors or issues
which effect sharpness.
|
* |
Is the road smooth
or rough? |
|
* |
Does the road have
pebbles or rocks on it which can deflect the car slightly and induce
wobble as it passes over them? |
|
* |
Will the engine be
running or will the car be pushed/pulled? The ideal scenario is one
where the car can roll up or down an incline with the engine
switched off. |
|
* |
Does the car have a
locked differential which prevents the car rolling around a bend?
This is quite common on most high power muscle and drag cars. |
|
* |
How long is the boom
being used and what is it made from? Carbon Fiber is an ideal
material but extremely expensive. Aluminium is inexpensive but can
flex significantly. |
|
* |
How is the rig or
boom attached, vacuum cups or under the body? |
|
* |
If attached with
vacuum cups, are they on a rigid part of the car, eg windscreens or
other rigid points? Panels, such as roofs and bonnets can flex
considerably. |
|
* |
If attached with
vacuum cups, are they stiff or flexible? |
|
* |
If the engine will
be running during the shoot, will it shake so wildly that it might
shake the rig off (such as in a burnout shot)? |
In some cases it is
simply not possible to achieve a sharp image so it may be necessary to
composite 2 or more images to achieve the final image. You might even
find this to be the only practical and reliable way to work. In any
case, it's always a
good idea to shoot a few images of the car whilst it is stationary,
preferably in the same light as the rig shots themselves, so that you
have at least one image where the car is razor sharp in case you need to
composite images later.