| Topic: |
Battery powered
36 Watt fluorescent light for light painting cars
|
|
Author/Copyright:
|
John Jovic
|
This article describes the
construction of a compact and portable 12 volt powered 36 Watt fluorescent light (not
LED) which is suitable for light painting cars at night or it could be
used for other painting with light applications.
 |
|
 |
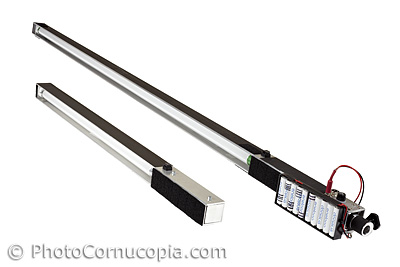
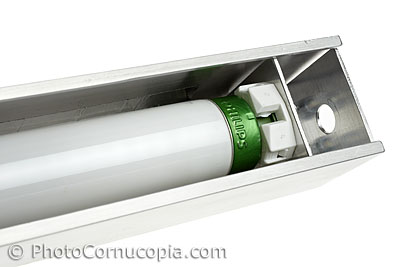
| The
light is a standard 36W household fluorescent tube in a sturdy housing. The tube
is approx 1200mm long! |
|
Battery powered, in this
case with 1 hours worth of AA NiMH goodness!
|
The light is built into an aluminium housing
which is compact and light enough to use
comfortably. This housing contains the 36 Watt fluorescent tube which is 1200mm
in length, the
electronics (the inverter) which converts the 12 volt from an
external battery or power source into the high voltage needed to
operate the fluorescent tube, a power socket and a power switch.
Nuts and bolts
WARNING: Fluorescent lights and inverters are high voltage devices so
are potentially dangerous. If you don't know how to safely wire, or
operate these kinds of devices then do not attempt to do so, and if you
do, then do so at your own risk.
The principals described below can be modified to suit your own
application so you could build a light which uses multiple tubes or
possibly tubes of greater length and power. Ultimately everything will
need to fit around the inverter that you use so selecting an inverter is
really the starting point.
A brief parts list, listing only the major components, is as follows.
The cost will depend on the components used and the most expensive will
probably be the inverter.
| Item |
Approximate Cost |
| 12 volt
to 36W Fluorescent Inverter (to suit 36W-40W tube) |
$50 |
| T8 36W
fluorescent tube to suit |
$4-20 |
| T8
fluorescent lamp holders (or tombstones) |
$2 each |
| on/off
switch |
$3 |
| input
socket(s) |
$3 |
| fuse
holder/fuse |
$5 |
| aluminium
case, fasteners, wire, Velcro, tape, heat shrink etc. |
$10-30 |
| suitable
battery |
? |
|
 |
| |
18 (left) and 36 Watt (right)
lamps are show here for comparison. The 18W fluorescent lamp is described in the
article Battery powered
18 Watt fluorescent light for light painting cars. |
The Fluorescent Inverter is a
form of Electronic Ballast and is the
heart of the light as it converts a low voltage direct current (DC)
into a high frequency high voltage alternating current (AC) which is
applied to each of the 2 filaments at the ends of the fluorescent tube.
Note that Fluorescent Inverters are not normal DC to AC Inverters which are designed to convert
DC to household voltages at 50/60Hz. Also note that normal Electronic Ballasts
typically work at mains voltages and not from low voltage DC sources. Fluorescent inverters are
available in many configurations of input voltage and output load (type
of fluorescent light) so choose one which suits the
fluorescent tube that you want to use. They can be sourced from
specialist solar, camping, off-road or similar suppliers dedicated to low
voltage equipment. The inverter used here is designed to operate
36W tubes.
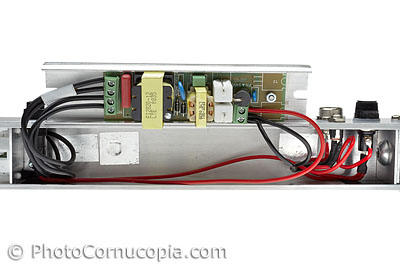
Inverters must be wired strictly as per the manufacturers instructions.
The Inverter is connected to the battery via a socket and a power
switch which is suitable for the current load. It's also a good idea to
install a fuse to protect against electronic faults or short circuits
(refer to the Inverter manufacturers recommendations). The wiring used
must be suitable for the high voltages supplied by the inverter,
again refer to the inverter manufacturers recommendations.
 |
|
 |
| The
12 volt inverter fits neatly into the housing. The inverter produces
high voltages to drive the fluorescent tube so safety precautions must
be taken to ensure that these high voltages can never be contacted
accidentally. |
|
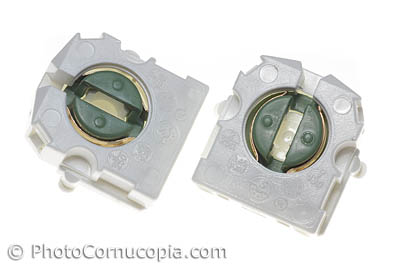
The fluorescent
lamp holders are often called tombstones and are available in many
shapes and sizes depending on their intended application and how they
will be attached. These are for T8 tubes.
|
 |
|
 |
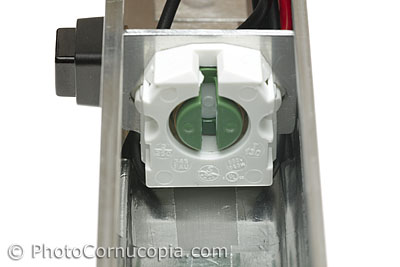
| The
tombstone lamp holders are fitted on a simple angle bracket and wired
from below. |
|
Identical
tombstones are used at both ends of the housing.
|
The housing is made from a
40mm aluminium extrusion because that particular extrusion allowed the
inverter and other components to fit neatly inside. You might have to
use a larger extrusion depending on the inverter used. Aluminium
extrusions are available in a bazillion sizes and you can even have them
moulded to your own dimensions if you really want to, but you'll
probably have to make a 250Kg batch of them! It's easier to just see
what you can get from importers or suppliers in your area and just make
it work for you.
Black non reflective tape was used on the external surfaces of the
housing so that it didn't reflect any ambient lights and therefore
appear in images.
 |
|
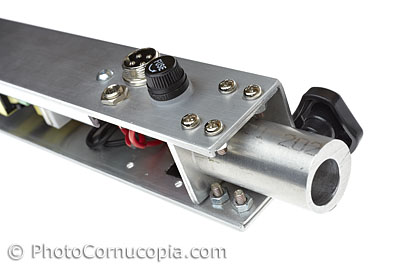 |
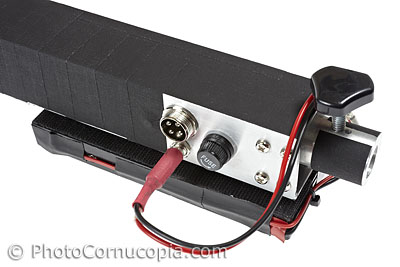
| The aluminium housing has a socket for power. The battery
holder is attached to the housing using Velcro hook and loop strips and
can be positioned so that it doesn't interfere with holding the light. Any kind of 12
volt battery could be used. |
|
The base of the light
was also fitted with a Female 16mm or 5/8th inch adapter to allow
the light to be fitted to light stands for easy storage between
shots. This also allows the lamp to be held above the car with a
suitable extension or 5/8th inch rod.
|
The 12 volt power
source is a group of 10 AA NiMH 2000mHh batteries which are wired in
series. I used NiMH batteries because I have lots of them, as do most
working photographers. This battery pack is capable of powering a 36W
tube for approx 1 hour but you could use higher capacity NiMH
batteries, or just bring a spare set. Any 12 volt battery could be used as long as it is
capable of supplying the moderately high continuous current of 1.5
Amps. NiMH batteries are quite good at supplying that kind of current
for extended periods and I found that the batteries where cooler after
1 hour of continuous operation than they are after heavy use in a Canon
580EXII flash!
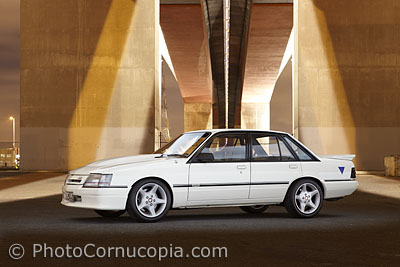
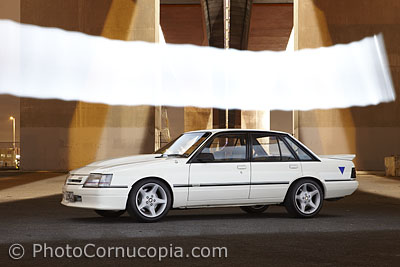
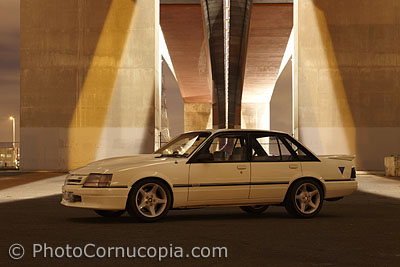
Does it work?
Yes, and quite well too. It's not too heavy, cumbersome, dim or
anything else. It provides an evenly distributed light at about the the
right intensity however this will always depend on which aperture and
ISO you want to use.
For those unfamiliar with automotive light painting a full description
of the technique can be found in the article Automotive Lighting 8:
Painting with Light.
The test images
above where shot with a 6500K light source to cause the background colour to
contrast dramatically with the light painted image
however a different colour tube could have been used for a different effect. If a
30000K
tube had been used, which is a similar colour to the ambient Sodium lamps, then the background would
look more natural and less amber. 5000K tubes are also quite common and balance fairly
well with flash and Metal Halide street lights (the white ones). In this
case however the background lighting was from a mix of Sodium and Metal
Halide lamps so it would be impossible to balance both simply by using a
specific colour temperature tube.
Fluorescent tubes
have a minor inherent disadvantage in that they take a little while to
warm up before they reach maximum light output. When the tube is first
switched on it is cold and may produce a full stop less light then when
it is warm. Once warm it will produce a relatively consistent light
even if switched off for short periods so in practice the difference in
light output is generally insignificant.
Why?
Why didn't I just use an LED strip? The LED's in LED strips are usually
spaced apart so their reflection in a car panel can potentially appear
as multiple lines instead of a continuous strip. Although steps can be
taken to diffuse these spots of light into a long continuous strip,
such as simply placing a diffusing material in front of them, a
fluorescent tube is inherently a much more evenly illuminated source so
is a better choice in this respect.
If you are looking for the cheapest option then just wander off to your
nearest hardware or aftermarket auto store where you can buy a very similar
fluorescent or LED 'work light' for relatively little cost. Such a light would need a few minor
modifications, maybe just a carefully placed reflector or cutter
(shield). However I wanted something that was potentially more sturdy, effective
and just bigger, so I
decided to make my own. But I'm an electronics geek and I like doing
that kind of thing anyway.