|
Topic: |
Automotive
photography 9: Panning, rolling and action shots |
|
Author/Copyright: |
John Jovic |
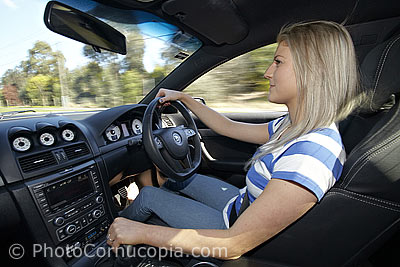
Panning and
Rolling shots are probably the most commonly used techniques to show a
car in action although rig shots have become very common too. Panning
and rolling shots are quite different from each other in that panning
shots are taken from a stationary position whilst rolling shots are
taken of the subject car from another vehicle travelling at the same
speed as the subject. Rolling shots look often very similar to rig
shots except that the amount of blur possible in a rolling shot is much
smaller than that which is possible in a rig shot.
 |
|
 |
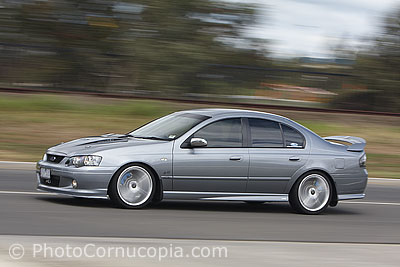
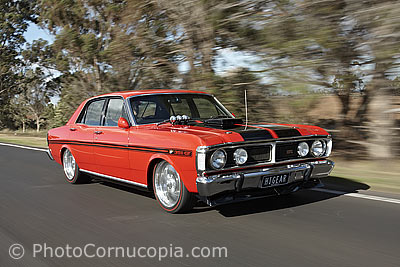
This is a fairly typical panning shot.
1/45th sec, 85mm at F9.5, ISO 100, Canon 40D (1.6 crop) |
|
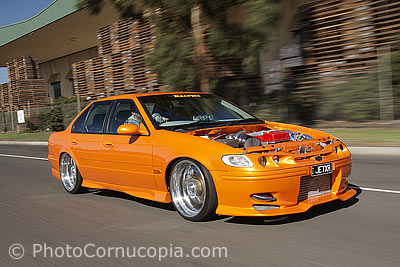
This is a fairly
typical rolling shot.
1/45th sec, 28mm at F9.5, ISO 100, Canon 40D (1.6 crop) |
Panning, rolling and other types of action images will be discussed
here whilst rig shots are covered in great detail in the links below so
will not be expanded upon here.
Rig Shots 1: What is a 'rig
shot' ?
Rig Shots 2:
Rigs for automotive photography
Rig Shots 3: A
brief history of rig shots
Rig Shots 4: Partial Rig Shots
Rig Shots 5: Full Car Rig Shots
Rig Shots 6: The mechanics of rig shots
Rig Shots 7:
Rig shots are not for the foolhardy
Rig Shots 8: Do Vacuum Cups damage
paint or panels?
Rig Shots 9:
Selecting the optimum shutter speed
for rig shots
Rig Shots 10: Composition and locations for
rig shots
Rig Shots 11:
Filters for rig shots
Rig Shots 12:
Common problems, dust flare, vignetting
Panning shots
Panning is a
technique where you are photographing a moving car from a stationary
position using a low shutter speed to depict a sense of movement, speed
or action. Although panning is a simple technique there is an element of
experience (practice) which is as important as any amount of theory,
tips or tricks. The most important point is to be as smooth as possible
when following the subject (car, truck, bike, bicycle, skateboard, surfer,
whatever) you are shooting. This ONLY comes from practice and not from
technology such as image
stabilised (IS/VR) lenses which can often make matters worse.
 |
|
 |
|
1/20th sec, 100mm at F2.8, ISO 200 with Canon 20D
(1.6 crop) |
|
1/30th sec, 115mm at
F2.8, ISO 400 with Canon 20D (1.6 crop) |
Locations for Panning
shots
Finding a place to shoot
panning shots is not always easy because you normally want to avoid
distracting backgrounds such as business names/signs, other cars,
shadows from trees or power lines or objects which might protrude from
the car like a tree from a persons head in a portrait. You also need a
place where you can have the proper distance between yourself and the
car, without obstruction between you. A smooth road is also much better than one which is
bumpy and where the car will be bouncing around as it passes you.
Camera or exposure mode
The aperture setting is much
less important than the shutter speed as the shutter speed will
determine the amount of movement and blur in the image. Set the camera to Shutter
Priority exposure mode so that you can select an appropriate shutter
speed. Let the camera set the aperture automatically based on the
required exposure.
Selecting a shutter speed
If the shutter speed is too low (long) then there
will be too much movement and blur and then you may not get many
acceptably sharp shots (keepers), if any at all. On the other hand using too fast (short) a
shutter speed will show very little movement in the background or wheels
so the images won't have any sense of speed or movement. They might all
be sharp but what’s the point if they don't show any sense of movement?
The goal is to find a shutter speed which will give you a decent amount
of blur in the background and wheels and a reasonable number of keepers
for the session, maybe only 30% or less, but you only ever need one
shot! You could also use a very slow shutter speed and have way more
blur than might be deemed normal or acceptable but it might be the
effect you are after and as long as an important part of the car is
sharp, maybe the grille, or the driver, or the number/name on a race
car, then that is probably OK too.
The shutter speed you choose will also depend on the reliability needed
from each frame that you expose. For example, some cars may only be good
for a single pass, for what ever reason, so you need to be sure to get
it right the first time. This is best done by erring on the high side
and getting less wheel/background blur than might be desirable. If you
have the option to have lots of passes then you can start at a high
shutter speed, and get a few frames 'in the can' and then shoot the rest
at slower and less reliable shutter speeds but which will probably
deliver much stronger images albeit a smaller selection to chose from.
The easiest way to select the shutter
speed is to convert the cars speed into miles per hour and then use the
reciprocal (1/Mph) of that speed as the shutter speed.
For example, if
the car is moving at 100kph (60 mile per hour) then shoot at approx
1/60th of a second. If the car is moving at 60kph (40 mile per hour)
then shoot at approx 1/40th of a second. This is only a guide and a
starting point but it's certainly in the ball park and a small
adjustment one way or the other will probably give you the effect you
are after. If you are shooting race cars then you might be panning at
1/250th and still getting a considerable amount of blur, simply due to
the higher speeds involved. The shutter speed also depends on the lens
(and your distance to the car) and even the way the car is moving past
you, or towards you such as might occur on a race track. If you use a
reasonably wide lens then you can shoot at even slower shutter speeds,
but this takes trial and error to see what works for you and what is
acceptable.
Choosing a lens
Lens choice is quite important and will have a significant effect on
the results you achieve.
Often the car moves
at a tangent to you (ie. in a straight line) whilst you are panning in an
arc (pivoting at your feet). What this means is that only a small part of the car,
such as the front or rear of the car, will actually
be sharp and other parts will be blurred. The further the car is from you the sharper
the extremities of the car will be in each image. If the car is closer to you, because
you are using a short tele or wide lens, then the car will have much
more blur at it's extremities due to the way it moves past you during the
exposure. Even better results can be obtained if the car is shot
from the inside of a large diameter bend so that the car moves in an
arc instead of at a tangent.
Of course you may not always be able to choose the lens. You might
be forced to use a very long lens due to being behind a safety
barrier at a race track or you might not be able to get far enough
from the car you are shooting, for example on a suburban street, and
may have to use a relatively short tele or even a wide angle lens.
However, if possible, try to use a tele zoom lens in the 70-200 range (or longer)
and zoom in and out as the car comes closer and further from you.
This focal length is enough to give a reasonably sharp image of the
car although the extremities will generally be slightly blurred and
improved as focal length increases. If you only have a prime telephoto lens then that’s fine too but you
may be limited to fewer frames for each pass as the car is the
appropriate distance from you to fill the frame.
Image stabilisation ('IS' in Canon parlance) can be used but it's
effects can some times work against you rather than for you. IS is
intended to reduce camera shake so it compensates for camera/lens
movement. If you use the wrong IS mode then that will try to
compensate for the panning movement itself. Canon offers 'Mode 1'
and 'Mode 2' where Mode 1 is designed to minimise all movement
(including panning) whilst Mode 2 is designed to reduce vertical
shake but allow panning movement. Other brands of cameras will have
their own terminology but the fact remains that if you do use IS
then you need to understand how your camera/lens works and if it is
compatible with panning, or more specifically, what kinds of panning
will it benefit. Even so, IS can cause more harm than good as the
panning action itself may still exceed the lenses image
stabilisation ability and can lead to double images as the IS tries
to compensate. IS does work very well with longer lenses and with
the resulting slower pans and higher shutter speeds (due to greater
distance from camera to car) so can be useful.
Focusing for panning shots
Although you can use manual focus lenses to shoot panning shots it's
much easier to use auto focus lenses as long as your camera has the
ability to focus on a moving subject with some degree of accuracy.
Use which ever mode will actually track focus as the
car changes distance, this is 'AI SERVO' in Canon parlance.
There's no point using 'one shot' or similar AF
modes because the cars distance often changes as it drives past you
(unless you are in the centre of a large sweeping bend where the cars
distance remains about the same whilst it's in that bend). If using
manual focus lenses then you may have to pre-focus on a part of the road
where you intend to shoot the car but this will generally only allow you
to shoot one or two frames before the car is already out of the focusing
'sweet spot'. If you have enough experience manual focusing lenses on
moving subjects then following the car and adjusting focus can work just
fine but if using a prime then there will probably be only a very small
area where the car is the appropriate distance (in terms of composition
and framing) so pre focusing is generally a better option.
Panning technique
The simple reality is that your technique or action is more important
than the camera or lens or possibly anything else. When you are trying
to capture a sharp image of a moving car, but with lots of background
blur, then it will always be very important to try to keep the car in
the same part of the frame at all times and with the minimum amount of
camera shake or movement. Even if you do everything else correctly, you
will ruin the image if you are not smooth in your panning movement.
Every part of your action matters, even the way you press the shutter.
Jabbing it will shake the camera, gently and smoothly depressing it will
not.
The easiest way to make your action smooth is simply to find a stance
that feels comfortable for you and to practice. Start with standing with
a small distance between your feet and facing the section of the road
where you intend to shoot. Keep your feet stationary as you gently pan
from side to side, pivoting at your feet, and keeping your upper body
and shoulders reasonably stable. Remember that you are trying to keep
the camera as steady as possible so keeping your shoulders steady will
help to do that. This is fairly easy over a short distance or pan but
becomes more difficult as you overstretch. Your action will be smoothest
over a relatively narrow arc which is ideally where you intend to shoot
the car as it passes. You can practice this technique on a nearby road,
with passing traffic, but be ready for the strange looks from passing
drivers!
Use a monopod if you can get used to them but some people can't live
with the restriction in movement that they cause. Monopods help you to
pan smoothly but there's no reason you can't pan smoothly without one,
given practice/experience. A very large or long tele may need a monopod
but you are also far more likely to pan over a very short distance so
the monopod will cause relatively little restriction.
If you are staging the panning shots then have the car driving at a constant and safe/legal speed. If the car is
all over the place in terms of it's speed then it will be much harder
for you to follow it smoothly as it passes you. Keeping a constant speed
also allows you to change shutter speeds to suite the speed of the car.
Fire off as many frames as you can per run or pass using 'continuous'
shooting mode. It's a numbers game and the more frames you shoot the
more keepers you'll have. There is no point firing off a single frame
per pass (unless there is a specific reason to do so). Another advantage
of using a 'continuous' shooting mode is that you are not pressing the
shutter, you are just holding it down, so there is less chance of camera
shake.
Rolling shots (also called 'Tracking Shots' or 'Car to Car')
Rolling shots are shot using a tracking car from which the photographer
shoots the subject car. Both travel at the same speed and side by side,
or in close proximity. The subject car is photographed hand held and at
relatively slow shutters speeds so that the background and foreground
blur enough to give a sensation of speed whilst keeping the car sharp.
You will obviously need a tracking car and a driver to be able to shoot
rolling shots, and an appropriate location or road. It is often easier
to shoot panning shots because an additional car and driver are not
always available.
 |
|
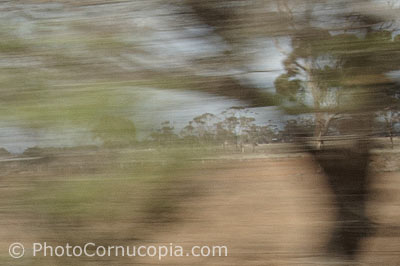 |
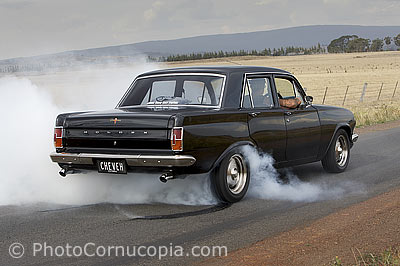
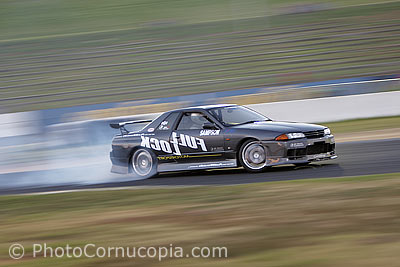
This is a typical rolling shot.
1/45th sec, 27mm at F198, ISO 100 with Canon 40D (1.6 crop) |
|
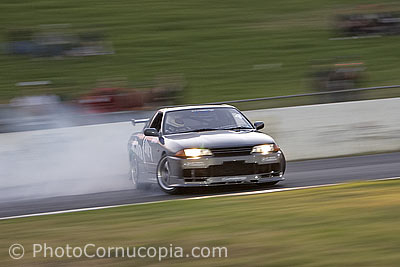
This crop from the
image at left shows one of the problems with rolling shots which is
that distant objects blur far less than those closest to the camera.
In the above example the nearby shrubs and trees blur dramatically
whilst distant trees are still quite sharp. This effect does not
occur with panning shots where distant objects blur the same as
those closest to the camera. |
Rolling shots are the staple action shot in new-car-magazines
although the rig shot has replaced it in many cases. Rolling shots look
very much like rig shots, with blurred backgrounds and a very sharp car,
but as they are shot hand held the exposures must be short enough to
keep the subject as sharp as possible so they often don't have as much
dramatic background blur as a rig shot.
A rolling shot is easiest to shoot on a double lane highway, or wide
private road such as a race track, where the car being photographed and
the tracking vehicle (with the photographer in it) can travel side by side at
the same speed and in total safety. Rolling shots should never be
performed whilst over taking or on roads which are too short and require
abrupt changes of speed. Safety is paramount. The tracking vehicle may
be in front of, behind or side by side with the subject car depending on
the image being shot and the direction of the light. In any case the
photographer will simply photograph the subject through an open window
of the tracking car. If a safety harnesses is used then it's potentially
quite safe to shoot from the back of a car, boot, wagon, pickup/ute tray
etc, however this would potentially be illegal on public roads so is
only an option on private roads or race tracks. In fact
shooting from an open car window may also be illegal if you don't have a
seat belt on or if you are protruding from the car so be careful to
avoid doing that.
Most experienced new-car-magazine photographers will have at least one story of
a near-miss where they have almost fallen out of a car or nearly
been struck whilst hanging from a vehicle, or similar. Rolling shots
are potentially dangerous and are best avoided unless shot from the
safety of a passenger seat with a seat belt fitted and safely within the tracking car.
It is entirely possible and realistic to shoot rolling shots safely if
you are willing to accept the limitations on shots and angles this also
imposes.
Capturing the right combination of background blur but with a razor
sharp car is dependant on several factors, such as the speed you are
travelling at, the proximity of the background to the car being
photographed, the composition itself such as when shooting the subject
side on, front/rear 3/4 or dead on front/rear. The road surface itself
will also have an effect, and it's proximity to the camera such as when
shooting from close to the road surface which is possible if shooting
from the rear of a ute or wagon (although potentially very dangerous and
not recommended). If the road is very rough or bumpy then both the
subject and tracking car will move too much and make it very difficult
to achieve a sharp image of the subject car. A smooth road will allow a
longer exposure and it will make it easier to follow the subject car
smoothly. Choosing the best shutter speed will always take some testing
depending on the circumstances and may be as low as 1/8th sec or as fast
as 1/250th, but often around 1/30-1/60th at normal road speeds.
IS and VR lenses are potentially quite helpful when shooting rolling
shots as they will stabilise the camera and lens from minor vibration.
It is also important to reduce camera vibration as much as possible by
not resting your elbows on the tracking car which will just pass
vibrations onto the camera.
Other action shots
There are many other forms of action shots, including rig shots,
depending on the type of car being photographed. In all cases the
purpose of the image is to portray a sense of action, drama, movement or
the sense of actually being there part of the action.
 |
|
 |
|
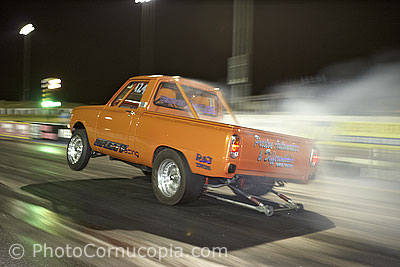
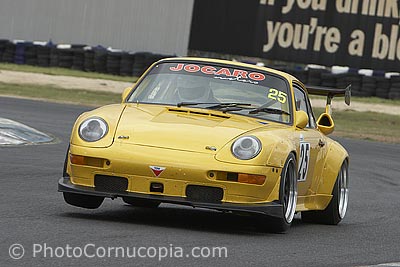
A circuit car may look more aggressive when it's
lifting a wheel during acceleration, or maybe when locking a wheel
during braking. |
|
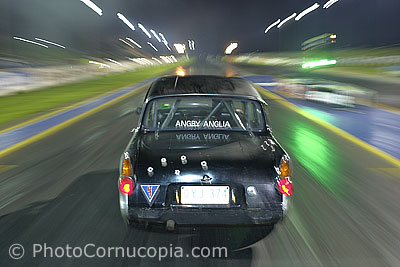
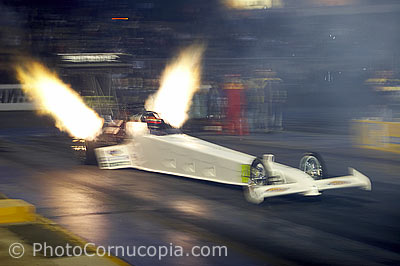
The excessive camera
shake/blur in
this image
conveys the explosive drama of top fuel drag racing. |
Using a combination of strobes and motion blur can be very effective in
low light situations. Good technique is still needed to keep the subject
sharp in the frame whilst maximising background movement.
|